Friday, March 25, 2011

Friday Card Club Projects-Nature Walk

Well, I spent a good part of last night putting these cards together. Each one was inspired by someone else's creation and I just put my own twist on it or used the materials I had available. I used the Nature Walk stamp set from the Occasions mini. I just love this set. 
I used Pretty in Pink, Sahara Sand, Rich Razzleberry, Early Espresso, and Very Vanilla on this one. I stamped in Early Espresso ink and water colored with the aqua pen in Pretty in Pink. I punched the bottom of the Espresso card stock with the Eyelet Punch and added a tab of the Pretty in Pink & white striped ribbon.  I copied Stampin'Up! demonstrator Amy Higgin's from Canada. I didn't find a blog for her but her card was just so lovely, I had to copy it. 
This one was CASED from another Stampin'Up! demonstrator, Lorrie Reid. She made a whole collection of cards like this and I just loved the colors. I used Sahara Sand, Baja Breeze, and Very Vanilla. I sponged the vanilla seam binding to match with Baja Breeze ink, and then sponged in Early Espresso and Baja Breeze. Oh, and I used the tulip border texture folder. Doesn't this just remind you of spring?
The idea for this one was copied from a card that Kirsten Davies made, she's another Stampin'Up! demonstrator. I tweaked it a bit and used different ribbon and embellishments. This one was made using Sahara Sand, Certainly Celery, and Very Vanilla. I used Certainly Celery ribbon and a vintage looking brad on the bow. I also corner rounded the top right of the card which Kirsten did on her original as well. 
Yay! So, here is the last of my card collection. My favorite color is green so when I saw this one, I had to copy it as well. I copied a card of Terry Blais. You can visit her blog here: http://goinovertheedge.blogspot.com/. I used Sahara Sand, Certainly Celery, Early Espresso, and Very Vanilla card stock. I stamped the Celery card stock with Wild Wasabi ink as well as the birdcage. To finish it up I chose the lace ribbon, a suede button, and a bit of  hemp twine. 
Hopefully, these ideas will inspire you to create something lovely with the Nature Walk set too. Thanks for stopping by!
Tomorrow I will be showing you the portfolio I designed to put these fun cards in. As always, let me know what you think of today's post. It's always good to hear feedback or know that someone stopped by. 


Cupcake CASE (copy and share everything)

At Tuesday night's SASSY Meeting we did two cards. This was the second card I shared with the ladies....
I thought this was such a fun card when I saw it, I just had to share. I found it here: http://totallyawake4-stampin.blogspot.com/ Isn't the pedestal clever? Can you believe that it is the tab punch? Can't you just think of all the other ways to use this? Endless possibilities!!! 
I hope you enjoyed today's post. I am off to create a set of cards for my Card Class on Friday night. I will post what I come up with tomorrow. Happy Stamping!

Thursday, March 24, 2011

March Sassy Meeting

Last night was our SASSY Meeting and it was my month to host for our group. I spent all day stressing out because I had agreed to teach the Never Ending Card and well, it's not an easy thing to do or an easy card to design. I was literally working on it all afternoon and finished it as the ladies were arriving! The folds on the card are not so difficult once you make one and see how it is pieced together, it's the design and elements that are difficult to put together because it is like doing 4 cards at once that have to coordinate. Well, this is what I came up with.....


I think it turned out pretty good, if I do say so myself, and I was happy to share it with the other ladies at our meeting. I tried to make each of the folds say something different and can you believe that I didn't use ANY DSP? We really stamped all of the pieces and put them together! I also like that I did it in colors that would work for a boy or man's birthday. I have 2 girls and I don't do alot of Man Cards....at least I haven't. I just might start! :o) The ladies seemed to like it so I believe it was a success! 
I hope this inspires you to at least try one of these fun cards. I'm not sure you'd want to make a ton of them, but it's worth the experience for such a cool card. 

Don't forget that the SaleABration ends on March 31st! This is the last week to get in on the FREE stamp sets offered from Stampin'Up! with every $50 order! If you wait too long....you will miss it, so stop by and place your order today. Catalog link is on the left as well as the link to order from me 24/7. 

Leave a comment and let me know what you think of the Never Ending Card project I made for our meeting. Thanks for stopping by today! See you again soon....


Thursday, March 17, 2011

Workshop Projects

Last week, I held a workshop for my cousin Renee and her friends. We had a really good time and Renee was able to get several extra free sets with the SaleABration going on until the end of the month!
I cased this card from the Stampin' Connection site to make at her workshop. You can view it on this blog: http://www.seasonsofstamping.com/2010/06/sweet-centers-for-baby.html Everything was the same except the flower. We made these from the circle punch and a brad. I filled the sweet treat cups with Tic Tacs. Isn't this just adorable!
My friend Jolynn hosted a workshop as well and these are the projects I came up with for her night. She was interested in Birthday projects so I found these online and chose these two.
  
This is my first card with the Create a Cupcake set (#121915) from the Occasions Mini. I just love this set and there are so many fun things you can do with these cupcakes. I found inspiration here: http://expressivedesigns.wordpress.com/   I hope to show you in another post soon.  Oh, and since I have started back with Stampin'Up! I like to offer these fun favors at my workshops. It seems to set the whole mood and let people know another fun way to use your stamps and papers. You can dress them up for any occasion.
Our second project was this fun card Brandy did at her last workshop. I think she got the idea here: http://jackietopa.typepad.com/addicted_to_stamping/2011/02/who-wants-ice-cream.html  Isn't it fun! I have a craving for some ice cream....imagine that! I used the Petal Cone die (#121810) again, the same one used for the carrot! Then I ran it through the Big Shot with the Perfect Details Texturz Plate (#115962). This gives it the look of a ice cream cone. The scoops are the scalloped half circle from the same die and then used a circle punch to shape the scoops. Now, this one was done with the 1-3/4" Circle (#119850) but I like using the 2-1/2" Circle punchn (#120906) better. It makes them wider scoops and they fit a bit better on top of the cone. Either way you choose, who wouldn't love this as a Birthday card???

 
Thanks for stopping by today. Hope you liked my samples and will be inspired to make some of your own. Sale-A-Bration ends this month so if you haven't placed your order and received your FREE stamp set, go to my links and check out the catalog and get to it! You don't want to miss out on this sale! As always, your comments are welcome!
Until next time....
Happy Stampin!

Saturday, March 5, 2011

Easter goodies on the way...


Once again, Becky Roberts has such fun ideas on her site!! http://inkingidaho.blogspot.com/ When I saw this I knew I had to make one. Becky actually used a chocolate bunny. I was a little short on the real stuff so I grabbed my bunny stamp and stamped him on some Crumb Cake Cardstock with Early Espresso Ink. Then I cut him out and wrapped him up like a real chocolate bunny. Then I added the peanut butter egg because you have to have some real candy! Ha! Becky's was much cuter, but I had fun making this little carrot goodie. With Easter on the way, there's plenty of time to create more fun treats. I hope you'll be checking back for more fun ideas.....


Thursday, March 3, 2011

Boxes of Treats

When I was visiting my friend Cathy's blog http://scrappincatscreativeendeavors.blogspot.com/ I found this delightful treat box. She was gracious enough to share the Pazzle's cut file with me so I could make one of my own. Thanks Cathy!


It holds quite a bit of candy as you can see. Don't look too close....you may see my box coming undone! Eeeeeks! I didn't notice until I came to post this. Oh well, I guess we all make mistakes. Another reason to use the super sticky red tape for boxes and such. ;o) I used the Eat Chocolate set found in the Occasions Mini.

Becky over at http://inkingidaho.blogspot.com/ had a basket made out of the New Petal Cone Die also found in the Occasions Mini and I wanted to try one. I used the little leprechaun from a box we made at our up-line meeting this month. Well, only his head. I think he's adorable. His face is the ornament punch, hair was made with the scalloped oval, hat - circle punch and oblong oval, as well as the eyes and ears were smaller circle punches. He's filled with those little chocolate squares, however, I can see him full of those gold chocolate coins, eh? I didn't put a handle on him, but you certainly could. It would still be cute. This was my first one so you may see more once I get a chance to play around with the die.

This was the project Casey had for us at our SASSY meeting this month. I have made a similar box but this one was different because of the way it is tied on the side. The stamp set used is the Hosetess Level 2 set - By The Inch. Cute isn't it? I used one of these to wrap up a batch of my Irish Cream Truffles at Christmastime. So many uses....
Well, I am off to stamp some more fun stuff. Stay tuned for more....

Luck of the Irish

Here's another fun idea with the little leprechaun guy. Brandy hosted a workshop last weekend and came up with this idea. Mmmmmm, Ghiradelli Chocolate! 
His little clover is made with a small heart punch and a rhinestone in the center. The stem was made with a liquid dimensional paint. Almost too cute to eat.....almost! Thanks Brandy!

Tuesday, March 1, 2011

Building Blossoms....

The Occasions Mini is jam packed full of fun new sets available for a limited time as usual. I am a fan of any kind of flowers so the Blossom Petals Punch was one of the first on my list of must haves. I have seen some of the Stampin'Up! Demonstrator's make some fantastic blossoms from this punch. I was showing my youngest daughter how to make one for her basket/box tonight and this is the one I made. I am not sure of what I want to put it on just yet so I am showing you just the flower. I like the layered look as well as the 3-D effect. I didn't even use the Build a Blossom stamp set on these. I will be playing around more with this set and punch this week but I thought it would be fun to show that you don't need both to make something fun. 


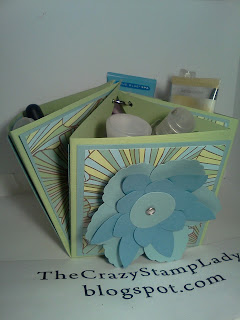
This was the box and flower that my daughter made! Isn't it cute! She used some old patterned paper and threw this together. She couldn't wait to fill it with her bath products and stuff. 
 
We'll have to add some ribbons to the binder clasp in the middle to fluff it up a bit. She is really liking the fact that I rejoined Stampin'Up! She gets to play with my stuff all the time and really enjoys creating. (Do I see a future recruit???) 
Just a reminder, this is the last month for the Sale-A-Bration. Don't miss out on the extra freebies available to customers who purchase $50 (before tax&ship), Hostesses with a workshop total of $300 (before tax&ship),  or join Stampin'Up! and get 15% of the demo kit AND a $50 Bonus Bundle! Not to mention the 30% off of your first order. Feel free to contact me to host a workshop or for more information. Thanks so much for stopping by today. Your comments are always appreciated!
Smiles!